Saturday, December 3, 2011

The Butterfly card - a long time in the making...


Have you ever taken a very l o n g time to put together a card? Well this one got started in about April at a night crafting session with my dear friends, Gerry and Marie. They were both scrapping that night and completed double lay-outs while I did about four half-cards. As is often the case, I didn't have all I needed with me to complete the cards and I took them home to finish. I always have such good intentions :)

The inspiration for this card came from the famous Teneale Williams. Hard to improve on her perfection - kept the same colours (she's pretty clever making More Mustard look attractive) but adjusted to lay-out. Added the silver ribbon because I love this ribbon (in every colour)!

I think I'm happy with it - really can't stretch it out any longer. But then again, I haven't given it away yet so a modification is still possible...

Thanks for looking.

Love from Crafty Kim

Friday, October 7, 2011

The Kimmidoll Tag


Has anyone heard the Kimmidoll Story? Beware parents of young girls...I recently came upon this line of Japanese dolls in my local gift store. And I was smitten. I could see myself collecting these but on this occasion, my excuse for purchase was the 10th birthday of a special girl. I didn't think to photograph the chosen doll but to give you an idea, here's what a Kimmidoll looks like:


She stands about 12cm tall, and is beautifully finished.

I made the gift tag above in colours to match the doll I chose. I'm not much of a bling-crafter but I think the gemstones finish it nicely.

I'm still loving Asian-themed cards - have a few more to share at some stage.

Thanks for looking.

Love from Crafty Kim

Thursday, October 6, 2011

Always Remember


Here's a sympathy card I made recently. It's a simple lay-out to suit the mood of the moment. I used a couple of techniques, one called Baby Wipe Technique which takes baby wipes and reinkers to create the coloured background (a bit simpler than brayering but a similar end result). Then I took a solid stamp and did some "silhouette" stamping.

I made a few backgrounds while I had the baby wipe all inked up so you might see another card along a similar theme some time in future.

Thanks for visiting.

Love from Crafty Kim

Sunday, September 25, 2011

Party Animals

A few months ago, I came across a range of paper featuring various party animals. One of the sheets had large size images perfect for card-making. I had to have those sheets. The paper range makes for quick, easy and colourful cards.

I made the card above for a friend who shares my interest in A Lion Called Christian. You might already know this true story but if not, it's worth a look, just click on the following picture:


In this same paper range, there is a tiger which suits a friend of mine who has a special connection with tigers:


Now before I sign off, I want to share a card with you using the same Party Animal range, from someone whose work I greatly admire, Kerry Bunting:


(Card and photo courtesy of Kerry Bunting)

Hasn't Kerry done a great job with the co-ordinating stamp? You can see more of this card (the inside) and its reason for being at Kerry's blog, just click on the picture above.

Thanks for visiting.

Love from Crafty Kim

Friday, September 2, 2011

Scrabble Card

This is the card I made for my friend [no prizes for guessing her name ;) ] who is very keen on Scrabble. The Scrabble-themed paper pretty much does it all. And I was running late by errr, a few months, so I kept it simple but took the time to decorate the inside too:


Well this post has to be very short but sweet (I hope) as the hour is late and the work day tomorrow is rushing up at me at high speed.

Thanks for looking.

Love from Crafty Kim

Thursday, September 1, 2011

Happy New Catalogue


HERE it is: the NEW Stampin' Up! Catalogue for 2011-2012.

Too much goodness to describe so please go and check it out for yourself. And if you'd like a printed copy, I'm selling them for $10 (local pick-up or drop-off) or $13 including postage within Australia. Please or email me or telephone 0402 347 010 to organise it.

I'm looking forward to hearing what items are on your wish list...

Thanks for looking.

Love from Crafty Kim

Friday, August 26, 2011

More Big Shot Techniques


Well, I thought I'd better pop-in to share some cards and let you know that I'm still breathing. Not crafting much due to never-ending work and there are times when I feel I should just pack away my craft stuff and give it all up. However, I recently embraced sleep deprivation and put together some cards using my Big Shot. There seems to be no limit on techniques to try with this machine.

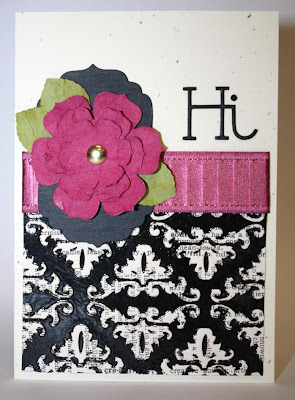
In the card above, I've used dry embossing through the Big Shot combined with heat embossing. I also stripe-embossed the satin ribbon in the Big Shot (with thanks to Angela Sargeant for this idea). I tried the "faux suede" technique (basically de-laminating cardstock into thinner layers with a rough surface by tearing, along with some scrunching and sponge-inking) and cut out the flower petals and leaves. A die-cut "Hi" finished it off but a stamped greeting would have done the job too.

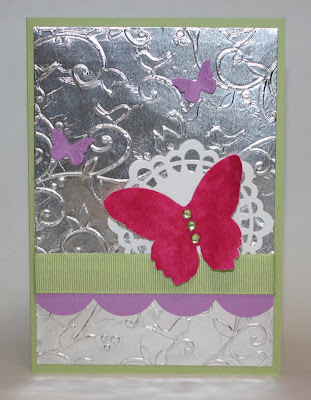
Did you know you can emboss aluminium foil? Thanks to Clare McIllhattan for this idea. Clare's foil was smoother than mine...must get a tip on "how-to smooth" from Clare. And you can cut and emboss fabric with the Big Shot. Picture me in a local needlecraft store feeling like a fish-outta-water. Imagine the look I got when I told the saleslady (aka superb needle crafter) that I was going to cut up her lovely pink fabric into scraps and die-cut it into a butterfly for a card:


I sure do admire the works of needle-crafters. I just can't do it myself. Each to their own I say.

Next is a card front that has been what I term selectively embossed. I managed to leave the centre panel of the card un-embossed ready for stamping. Quite tricky but once I got the hang of it, I was away. I finished up stamping a solid daisy in white ink and using my pencils to add colour (termed "Black Magic" colouring within some circles).


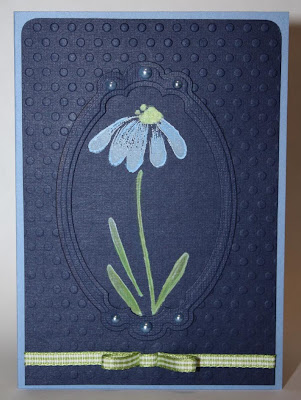
Do you like the frame around the main image? I used two nesting dies through the machine at same time and dry embossed them afterwards to get the grooves in the frame. I snuck a little green "faux bow" in there too.

Anyway, hope you found this interesting. I'm currently helping my cherub with a school project and the best thing about it is using my alphabet die-cuts to make the poster title (I know, I'm easily amused).

Thanks for looking. Please get in contact if you have any questions.

Love from Crafty Kim